
Introduction
Account systems are crucial for many applications and ecosystems. While some opt to build their own, others leverage external authentication providers like Google for a seamless user experience. This guide will walk you through integrating Google Authentication into your PatchKit Launcher, providing a secure and user-friendly login process.
Why It Matters
Implementing “Sign in with Google” offers several benefits:
- Enhanced User Experience: Users can log in quickly using their existing Google accounts.
- Increased Security: Leverage Google’s robust security measures to protect user data.
- Simplified Development: Reduce the complexity of building and maintaining your own authentication system.
Understanding OAuth 2.0
Before we dive into the implementation, let’s briefly cover the OAuth 2.0 standard, which forms the foundation of Google Authentication.
OAuth 2.0 is a protocol that allows secure authorization in a simple and standard method from web, mobile, and desktop applications. It defines a standardized way for authentication providers (like Google) to communicate with client applications (like your launcher).
The OAuth 2.0 Code Flow can be simplified into these steps:
- Your launcher redirects the user to Google’s authentication page.
- The user logs in and grants permissions to your application.
- Google redirects back to your launcher with an authorization code.
- Your launcher exchanges this code for access and refresh tokens.
- These tokens are used to authenticate the user and access Google services.
Step-by-Step Guide
1. Setting Up Google OAuth 2.0 Client
First, you need to create a Google OAuth 2.0 client:
- Open your project on Google Cloud Console.
- Head over to “APIs & Services -> Credentials” section.
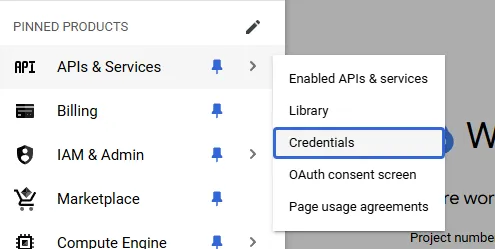
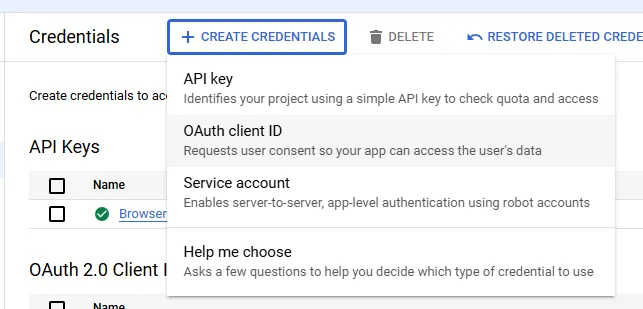
- Click on “Create Credentials” and select “OAuth client ID”.
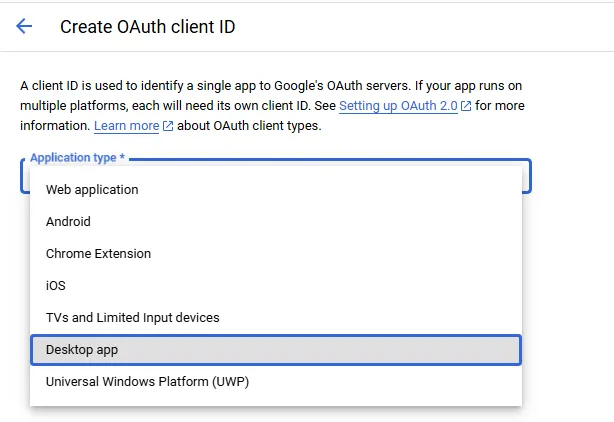
- Select “Desktop app” as “Application type”.
- Enter the name of your launcher and click “Create button”.
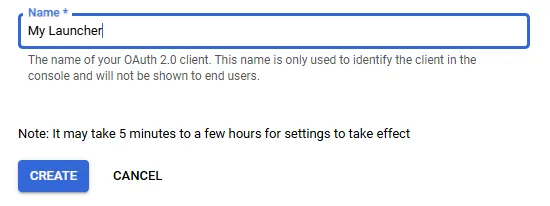
After completing the steps above you should be presented with the following popup:
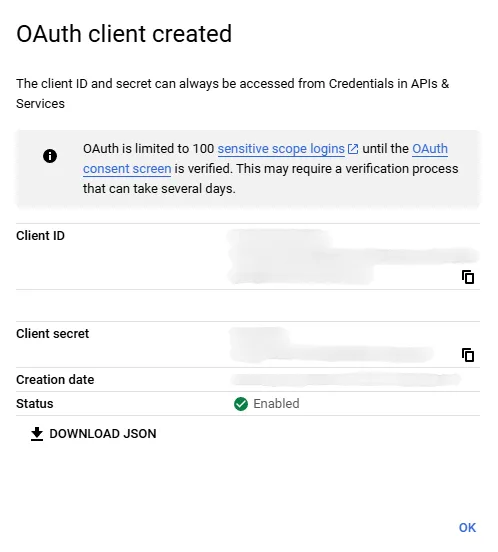
Make sure to save “Client ID” and “Client secret” as we’re going to need them later.
2. Implementing Google OAuth 2.0 in Your React Theme
Creating a React Context
Start by setting up a React context to manage authentication state and functions:
import {
  createContext,
  useMemo,
} from "react";

export interface UserAuth {
  id: string;
  displayName: string;
  avatarUrl: string | undefined;
}

export interface UserContextValue {
  userAuth: UserAuth | undefined;
}

export const UserContext = createContext<UserContextValue>(undefined!);

export function UserContextProvider({
  children,
}: {
  children: React.ReactNode;
}) {
  const userContextValue = useMemo<UserContextValue>(
    () => {
      return {
        userAuth: undefined,
      };
    },
    [
    ],
  );

  return (
    <UserContext.Provider
      value={userContextValue}
    >
      {children}
    </UserContext.Provider>
  );
}
Implementing Google OAuth 2.0 API Calls
Next, setup a few constants related to Google OAuth 2.0:
const OAUTH2_CLIENT_ID = `YOUR_OAUTH2_CLIENT_ID`;
const OAUTH2_CLIENT_SECRET = `YOUR_OAUTH2_CLIENT_SECRET`; // in case of Google OAuth 2.0 Desktop Clients, it's absolutely safe to expose secret in your client application

const OAUTH2_AUTH_ENDPOINT_URL = `https://accounts.google.com/o/oauth2/v2/auth`;
const OAUTH2_TOKEN_ENDPOINT_URL = `https://oauth2.googleapis.com/token`;
const OAUTH2_REVOKE_ENDPOINT_URL = `https://oauth2.googleapis.com/revoke`;
const OAUTH2_REDIRECT_URI_PATH = `google-auth`;
Now, let’s create a few helper functions required by OAuth 2.0 Code Flow (with PKCE extension):
export function generateUserOauth2CodeVerifier() {
  let userOauth2CodeVerifier = ``;

  const chars = `ABCDEFGHIJKLMNOPQRSTUVWXYZabcdefghijklmnopqrstuvwxyz0123456789`;

  for (let i = 0; i < 48; i++) {
    userOauth2CodeVerifier += chars.charAt(Math.floor(Math.random() * chars.length));
  }

  return userOauth2CodeVerifier;
}

export function generateUserOauth2State() {
  let userOauth2State = ``;

  const chars = `ABCDEFGHIJKLMNOPQRSTUVWXYZabcdefghijklmnopqrstuvwxyz0123456789`;

  for (let i = 0; i < 16; i++) {
    userOauth2State += chars.charAt(Math.floor(Math.random() * chars.length));
  }

  return userOauth2State;
}

export async function getUserOauth2CodeChallenge({
  userOauth2CodeVerifier,
}: {
  userOauth2CodeVerifier: string;
}) {
  const userOauth2CodeVerifierDigest = await crypto.subtle.digest(
    `SHA-256`,
    new TextEncoder().encode(userOauth2CodeVerifier),
  );

  return btoa(String.fromCharCode(...new Uint8Array(userOauth2CodeVerifierDigest))).replace(/=/g, ``).replace(/\+/g, `-`).replace(/\//g, `_`);
}
Now, let’s create a new interface that we’re going to use to store some extra properties related to user authentication that don’t need to be necessarily exposed in other parts of our theme:
interface UserInternalAuth {
  id: string;
  displayName: string;
  avatarUrl: string | undefined;
  accessToken: string;
  accessTokenExpireDateTime: number;
  refreshToken: string;
}
Now, we have everything we need to create a few functions that wrap OAuth 2.0 functionality inside:
import * as jose from "jose"; // Make sure to install "jose" as your theme dependency before using it in your source code

// ...

async function fetchUserInternalAuth(
  {
    userIdToken,
    userAccessToken,
    userAccessTokenExpireDateTime,
    userRefreshToken,
  }: {
    userIdToken: string;
    userAccessToken: string;
    userAccessTokenExpireDateTime: number;
    userRefreshToken: string;
  },
): Promise<UserInternalAuth> {
  const userIdTokenPayload = jose.decodeJwt(
    userIdToken,
  );

  return {
    // eslint-disable-next-line @typescript-eslint/no-non-null-assertion
    id: userIdTokenPayload.sub!,
    displayName: userIdTokenPayload.email as string,
    avatarUrl: userIdTokenPayload.picture as string | undefined,
    accessToken: userAccessToken,
    accessTokenExpireDateTime: userAccessTokenExpireDateTime,
    refreshToken: userRefreshToken,
  };
}

async function fetchUserInternalAuthWithOauth2Code(
  {
    userOauth2Code,
    userOauth2CodeVerifier,
    userOauth2RedirectUri,
  }: {
    userOauth2Code: string;
    userOauth2CodeVerifier: string;
    userOauth2RedirectUri: string;
  },
): Promise<UserInternalAuth> {
  const oauth2TokenEndpointResponse = await fetch(
    OAUTH2_TOKEN_ENDPOINT_URL,
    {
      method: `POST`,
      headers: {
        [`Content-Type`]: `application/x-www-form-urlencoded`,
      },
      body: new URLSearchParams({
        code: userOauth2Code,
        client_id: OAUTH2_CLIENT_ID,
        client_secret: OAUTH2_CLIENT_SECRET,
        grant_type: `authorization_code`,
        code_verifier: userOauth2CodeVerifier,
        redirect_uri: userOauth2RedirectUri,
      }),
    },
  );

  if (!oauth2TokenEndpointResponse.ok) {
    throw new Error(`Status: ${String(oauth2TokenEndpointResponse.status)}`);
  }

  const oauth2TokenEndpointResponseBody = await oauth2TokenEndpointResponse.json() as {
    id_token: string;
    access_token: string;
    expires_in: number;
    refresh_token: string;
  };

  const userIdToken = oauth2TokenEndpointResponseBody.id_token;
  const userAccessToken = oauth2TokenEndpointResponseBody.access_token;
  const userAccessTokenExpireDateTime = Date.now() + oauth2TokenEndpointResponseBody.expires_in * 1000;
  const userRefreshToken = oauth2TokenEndpointResponseBody.refresh_token;

  return await fetchUserInternalAuth({
    userIdToken,
    userAccessToken,
    userAccessTokenExpireDateTime,
    userRefreshToken,
  });
}

async function fetchUserInternalAuthWithRefreshToken(
  {
    userRefreshToken,
  }: {
    userRefreshToken: string;
  },
): Promise<UserInternalAuth> {
  const oauth2TokenEndpointResponse = await fetch(
    OAUTH2_TOKEN_ENDPOINT_URL,
    {
      method: `POST`,
      headers: {
        [`Content-Type`]: `application/x-www-form-urlencoded`,
      },
      body: new URLSearchParams({
        refresh_token: userRefreshToken,
        client_id: OAUTH2_CLIENT_ID,
        client_secret: OAUTH2_CLIENT_SECRET,
        grant_type: `refresh_token`,
      }),
    },
  );

  if (!oauth2TokenEndpointResponse.ok) {
    throw new Error(`Status: ${String(oauth2TokenEndpointResponse.status)}`);
  }

  const oauth2TokenEndpointResponseBody = await oauth2TokenEndpointResponse.json() as {
    id_token: string;
    access_token: string;
    expires_in: number;
  };

  const userIdToken = oauth2TokenEndpointResponseBody.id_token;
  const userAccessToken = oauth2TokenEndpointResponseBody.access_token;
  const userAccessTokenExpireDateTime = Date.now() + oauth2TokenEndpointResponseBody.expires_in * 1000;

  return await fetchUserInternalAuth({
    userIdToken,
    userAccessToken,
    userAccessTokenExpireDateTime,
    userRefreshToken,
  });
}

function getIsUserAccessTokenAboutToExpire(
  {
    userAccessTokenExpireDateTime,
  }: {
    userAccessTokenExpireDateTime: number;
  },
) {
  const isUserAccessTokenAboutToExpire = userAccessTokenExpireDateTime - Date.now() < 1000 * 60 * 5; /* 5 minutes */

  return isUserAccessTokenAboutToExpire;
}

async function invalidateUserInternalAuth(
  {
    userInternalAuth,
  }: {
    userInternalAuth: UserInternalAuth;
  },
): Promise<void> {
  try {
    await fetch(
      OAUTH2_REVOKE_ENDPOINT_URL,
      {
        method: `POST`,
        headers: {
          [`Content-Type`]: `application/x-www-form-urlencoded`,
        },
        body: new URLSearchParams({
          token: userInternalAuth.accessToken,
        }),
      },
    );
  } catch {
    // ignore
  }
}
Now, let’s extend the UserContextValue interface with two additional functions (startSignInUserTask and signOutUser):
export interface UserContextValue {
  userAuth: UserAuth | undefined;
  startSignInUserTask: () => Promise<void>;
  signOutUser: () => Promise<void>;
}
Also, let’s create a new interface which is going to be helpful for handling OAuth 2.0 Code Flow process:
interface SignInUserTaskState {
  userOauth2CodeVerifier: string;
  userOauth2State: string;
  userOauth2RedirectUri: string;
}
Integrating Everything in React Context
Now, let’s tie everything together in our React context:
const [
  userInternalAuth,
  setUserInternalAuth,
] = useState<UserInternalAuth | undefined>(
  undefined,
);

const [
  signInUserTaskState,
  setSignInUserTaskState,
] = useState<SignInUserTaskState | undefined>(undefined);
Now, we can create implementation for startSignInUserTask function (note: we’re going to use OAuth2 Loopback Server from PatchKit Launcher SDK to handle redirects from Google OAuth2):
import {
  configureOauth2LoopbackDefaultServer,
} from "@upsoft/patchkit-launcher-runtime-api-react-theme-client";

// ...

const startSignInUserTask: UserContextValue["startSignInUserTask"] = useCallback(
  async () => {
    const userOauth2CodeVerifier = generateUserOauth2CodeVerifier();

    const userOauth2State = generateUserOauth2State();

    const { oauth2LoopbackDefaultServerUrl } = await configureOauth2LoopbackDefaultServer({
      oauth2LoopbackDefaultServerConfig: {
        // Specify website that user is going to be redirected to once authentication is complete
        redirectUrl: `https://your-website.com`,
      },
    });

    const userOauth2RedirectUri = `${String(oauth2LoopbackDefaultServerUrl)}/${OAUTH2_REDIRECT_URI_PATH}`;

    // Preserve the details of OAuth 2.0 Code Flow as we're going to need them later to verify response
    setSignInUserTaskState({
      userOauth2CodeVerifier,
      userOauth2State,
      userOauth2RedirectUri,
    });

    const userOauth2CodeChallenge = await getUserOauth2CodeChallenge({
      userOauth2CodeVerifier: userOauth2CodeVerifier,
    });

    let userOauth2SignInUrl = `${OAUTH2_AUTH_ENDPOINT_URL}?`;

    userOauth2SignInUrl += `client_id=${OAUTH2_CLIENT_ID}&`;
    // If you need to request for additional scopes, you can request them here
    userOauth2SignInUrl += `scope=openid%20profile%20email&`;
    userOauth2SignInUrl += `redirect_uri=${encodeURIComponent(userOauth2RedirectUri)}&`;
    userOauth2SignInUrl += `response_type=code&`;
    userOauth2SignInUrl += `code_challenge=${userOauth2CodeChallenge}&`;
    userOauth2SignInUrl += `code_challenge_method=S256&`;
    userOauth2SignInUrl += `state=${userOauth2State}`;

    // Open sign-in page in system's browser
    window.open(
      userOauth2SignInUrl,
      `_blank`,
    );
  },
  [
  ],
);
And handle listen to OAuth 2.0 Loopback Server requests to find response from Google OAuth 2.0:
import {
  // ...
  focusWindow,
} from "@upsoft/patchkit-launcher-runtime-api-react-theme-client";
import { useOauth2LoopbackPendingRequestListener } from "@upsoft/patchkit-launcher-runtime-api-react-theme-extras";

// ...

useOauth2LoopbackPendingRequestListener(
  useCallback(
    async (
      {
        oauth2LoopbackPendingRequestController,
      },
    ) => {
      // Check if we received a redirect from Google OAuth 2.0
      if (oauth2LoopbackPendingRequestController.url.includes(`/${OAUTH2_REDIRECT_URI_PATH}`)) {
        // Dismiss the request so it's not marked as pending anymore
        await oauth2LoopbackPendingRequestController.dismiss({});

        // Create a new instance of URL class which helps us with query parsing
        const oauth2LoopbackPendingRequestUrlAsObject = new URL(oauth2LoopbackPendingRequestController.url);

        // Obtain OAuth 2.0 Code
        const userOauth2Code = oauth2LoopbackPendingRequestUrlAsObject.searchParams.get(`code`);

        // Obtain OAuth 2.0 State
        const userOauth2State = oauth2LoopbackPendingRequestUrlAsObject.searchParams.get(`state`);

        // Make sure that both `userOauth2Code` and `userOauth2State` are valid
        if (
          userOauth2Code !== null
          && signInUserTaskState !== undefined
          && signInUserTaskState.userOauth2State === userOauth2State
        ) {
          // Exchange the OAuth 2.0 Code for user authentication
          const userNewInternalAuth = await fetchUserInternalAuthWithOauth2Code({
            userOauth2Code,
            userOauth2CodeVerifier: signInUserTaskState.userOauth2CodeVerifier,
            userOauth2RedirectUri: signInUserTaskState.userOauth2RedirectUri,
          });

          // Preserve it in the context
          setUserInternalAuth(userNewInternalAuth);

          // Focus the window to regain user's attention
          await focusWindow({});
        }
      }
    },
    [
      signInUserTaskState,
    ],
  ),
);
Now, let’s make sure that we refresh user authentication right before it’s about to expire:
const [shouldCheckUserAccessToken, setShouldCheckUserAccessToken] = useState<boolean>(true);

useEffect(
  () => {
    if (!shouldCheckUserAccessToken) {
      return;
    }

    setShouldCheckUserAccessToken(false);

    // eslint-disable-next-line @typescript-eslint/no-floating-promises
    (async () => {
      try {
        if (userInternalAuth === undefined) {
          return;
        }

        if (
          getIsUserAccessTokenAboutToExpire({
            userAccessTokenExpireDateTime: userInternalAuth.accessTokenExpireDateTime,
          })
        ) {
          try {
            const userNewInternalAuth = await fetchUserInternalAuthWithRefreshToken({
              userRefreshToken: userInternalAuth.refreshToken,
            });

            setUserInternalAuth(userNewInternalAuth);
          } catch {
            setUserInternalAuth(undefined);
          }
        }
      } finally {
        await new Promise(resolve => setTimeout(resolve, 5000));

        setShouldCheckUserAccessToken(true);
      }
    })();
  },
  [
    shouldCheckUserAccessToken,
    userInternalAuth,
  ],
);
Lastly, we can create implementation for signOutUser function:
const signOutUser: UserContextValue["signOutUser"] = useCallback(
  async () => {
    if (userInternalAuth !== undefined) {
      await invalidateUserInternalAuth({
        userInternalAuth,
      });
    }

    setUserInternalAuth(undefined);
  },
  [
    userInternalAuth,
  ],
);4
And finally, let’s update the value of userContextValue with all of the stuff we created above:
const userContextValue = useMemo<UserContextValue>(
  () => {
    return {
      userAuth: userInternalAuth === undefined
        ? undefined
        : {
            id: userInternalAuth.id,
            displayName: userInternalAuth.displayName,
            avatarUrl: userInternalAuth.avatarUrl,
          },
      startSignInUserTask,
      signOutUser,
    };
  },
  [
    userInternalAuth,
    startSignInUserTask,
    signOutUser,
  ],
);
3. Using the Authentication Context
To use the authentication context in your launcher theme:
- Wrap your main component with the UserContextProvider:
createRoot(document.getElementById("root")!).render(
  <StrictMode>
    <UserContextProvider> // Include it
      <Root />
    </UserContextProvider>
  </StrictMode>,
);
- Use the context in your components:
import { useContext } from "react";

import { UserContext } from "./tut-user-context";

export function UserComponent() {
  const {
    userAuth,
    startSignInUserTask,
    signOutUser,
  } = useContext(UserContext);

  if (userAuth === undefined) {
    return (
      <button
        onClick={startSignInUserTask}
      >
        Sign In with Google
      </button>
    );
  }

  return (
    <div>
      {
        userAuth.avatarUrl !== undefined && <img src={userAuth.avatarUrl} />
      }
      <p>
        {userAuth.displayName}
      </p>
      <button
        onClick={signOutUser}
      >
        Sign Out
      </button>
    </div>
  );
}
4. Preserving User Authentication Between Sessions
To maintain user sessions across launcher restarts add following code to your context:
interface UserInternalAuthStoreState {
  value: UserInternalAuth | undefined;
}

const USER_INTERNAL_AUTH_STORE_STATE_LOCAL_STORAGE_KEY = "google-user-internal-auth-store-state";

const USER_INTERNAL_AUTH_STORE_DEFAULT_STATE: UserInternalAuthStoreState = {
  value: undefined,
};
And a few helper functions:
function fetchUserInternalAuthStoreState(): UserInternalAuthStoreState {
  const userInternalAuthStoreStateAsJson = localStorage.getItem(USER_INTERNAL_AUTH_STORE_STATE_LOCAL_STORAGE_KEY);

  if (userInternalAuthStoreStateAsJson === null) {
    return USER_INTERNAL_AUTH_STORE_DEFAULT_STATE;
  }

  try {
    return JSON.parse(userInternalAuthStoreStateAsJson) as UserInternalAuthStoreState;
  } catch {
    return USER_INTERNAL_AUTH_STORE_DEFAULT_STATE;
  }
}

function setUserInternalAuthStoreState(
  {
    userInternalAuthStoreState,
  }: {
    userInternalAuthStoreState: UserInternalAuthStoreState;
  },
) {
  const userInternalAuthStoreStateAsJson = JSON.stringify(userInternalAuthStoreState);

  localStorage.setItem(USER_INTERNAL_AUTH_STORE_STATE_LOCAL_STORAGE_KEY, userInternalAuthStoreStateAsJson);
}
Now, we can change the initial value of userInternalAuth state to be loaded from the preserved store instead:
useEffect(
  () => {
    setUserInternalAuthStoreState({
      userInternalAuthStoreState: {
        value: userInternalAuth,
      },
    });
  },
  [
    userInternalAuth,
  ],
);
Full Source Code
You can check the full source code of the React context here.
Besides, you can check out the repository of PatchKit Demo Launcher which contains more complex scenario of implementing Google and few other authentication providers.
Conclusion
By following this guide, you’ve successfully implemented “Sign in with Google” in your PatchKit Launcher. This integration enhances your launcher’s functionality, providing users with a familiar and secure login method.
Remember to handle edge cases, such as network errors or user cancellations, to ensure a smooth experience.
Next Steps
- Test your implementation thoroughly with different scenarios.
- Consider adding additional authentication providers for more options.
- Explore how to use the obtained tokens to access other Google services if needed for your application.